Parts Pre-Order (PPO) User Guide
Introduction
The Parts Pre-Order (PPO) service allows our customers to pre-order critical parts in advance for their upcoming projects.
These parts are then held in-house at Eurocircuits and readily available when you place your PCB and Assembly order with Eurocircuits. This helps to avoid any potential delays due to component availability.
When you launch a PPO, we immediately start the process of sourcing and procuring these parts and once delivered these parts will be available in your Eurocircuits customer account.
Once the PCB layout is complete you can upload the PCB data and the final BOM to the PPO order in your Eurocircuits customer account which will then follow the normal ordering procedure.
NOTE
- This service is only available if you have an approved Eurocircuits customer account, it is suggested that you first Sign In to your account to use the PPO service
IMPORTANT
- All orders placed using the PPO service are defined as confirmed and cannot be cancelled.
- You must create a PPO for each individual BOM. Please do not combine multiple BOMs in a single PPO.
- A PPO cannot be created for multiple PCB & Assembly orders, a PPO must be created for each individual order.
Getting Started
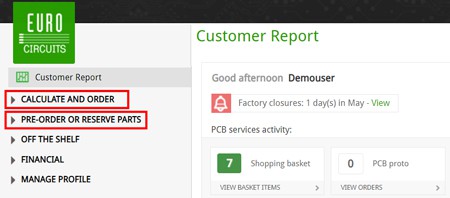
To create a Parts Pre-Order first Sign-in to your Eurocircuits customer account, your Customer Report window will open.
NOTE
- PCB or CPL data is not required when using the PPO service.
- If you upload your complete BOM you must delete the components that you DO NOT want to pre-order using the PPO service.
From the left-hand menu you can select either the PRE-ORDER OR RESERVE PARTS or the CALCULATE AND ORDER.
When you click on either of these two menus items, they will expand to reveal their sub-menu.
PRE-ORDER OR RESERVE PARTS
From the sub-menu of the PRE-ORDER OR RESERVE PARTS select Launch new.
IMPORTANT
- Ensure that the Pre-order parts tab is selected.
You can now either drag & drop your BOM data file into the area marked Drop BOM Data Here or click in this area to browse and select your BOM data file.
If you click in the area a popup will open to allow you to search, select and upload (open) the BOM file.
Once the Bom has been uploaded the BOM Editor will open where you can review the BOM list.
Next follow the steps below in the section name How to Create a Parts Pre-Order.
CALCULATE AND ORDER
From the sub-menu of CALCULATE AND ORDER select Calculate and Order.
You can now either drag & drop your BOM data file into the area marked Drop BOM Data Here or click in this area to browse and select your BOM data file.
For more information on how to upload the BOM data without PCB data please see our user guide on How to Upload BOM Data and refer to the section Uploading BOM Data without PCB Data and follow the instructions.
Once the BOM has been uploaded the BOM Editor will open where you can review the BOM list.
Next follow the steps below in the section name How to Create a Parts Pre-Order.
How to Create a Parts Pre-Order
Once the BOM data has been uploaded and you have checked and verified the data is correct follow the steps below.
IMPORTANT
- Set the correct number of PCBs that will be ordered and assembled in the PCB quantity field on the right column of the BOM editor. This will ensure the correct quantity of parts are pre-ordered.

In the BOM Editor of the PCBA Visualizer you will be able to review the imported BOM data and check if all parts have been correctly identified, the quantity is correct, and the price is shown.
You will also be able to search and select either Eurocircuits Generic parts or eC-stock parts as alternatives to those parts in your original BOM data, for help please see our BOM Editor User Guide.
Once complete click on the Proceed to Summary button (top right).
The Summary Tab
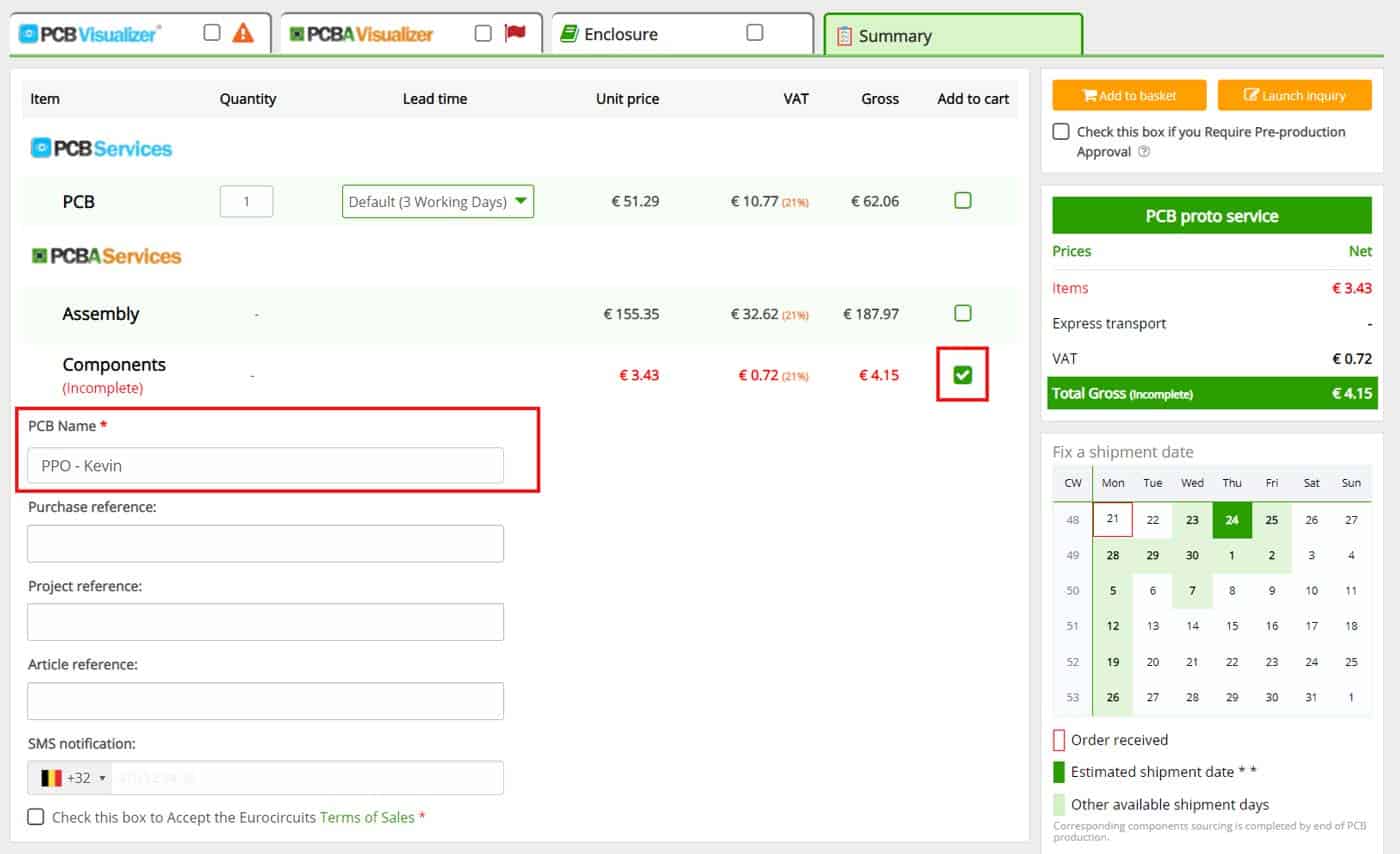
Firstly, ensure that only the check box for the row Components is checked in the Add to cart column.
Next add a PCB Name, this is a mandatory field.
You can also add other information such as the Purchase reference, Project reference, Article reference and SMS notification fields.
There are 2 orange buttons (top right), Add to basket or Launch inquiry, of which you need to click one to either save your BOM to your Shopping basket or to Launch inquiry for further help from our engineers.
Launch Inquiry
Click on the Launch inquiry button.
Next a popup will appear named Components service. At this point to launch an inquiry for components only click on the green Continue button.
NOTE
- If you do not wish to continue with the Components service click on the Cancel button and you will return to the Summary tab.
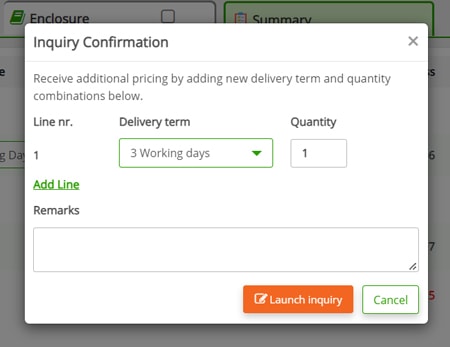
Once you have clicked on the green Continue button a new popup will open where you can change details and add some remarks.
Then click on the orange Launch inquiry button.
Our data preparation team will contact you either with an offer, or by using our Data Feedback system in case they have questions.
Add to Basket
If you have selected Add to basket, then a new basket item will be added.
A popup will appear named Components service. At this point to create a basket item with components only click on the green Continue button.
NOTE
- If you do not wish to continue with the Components service click on the Cancel button.
A new item will be created in the Shopping basket of your customer account.
IMPORTANT
- At this point you have not yet placed an order for the components, the PPO has simply been saved as an item in your Shopping basket.
You can continue to edit the BOM in this basket item (see BOM Editor User Guide) as required.
Ordering Components using the PPO Service
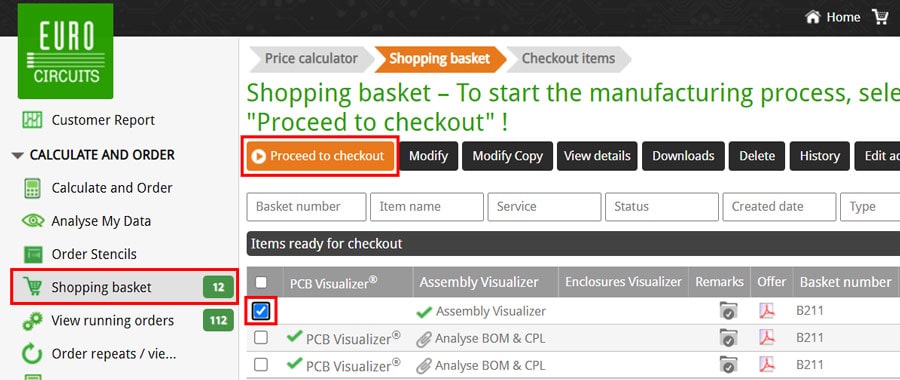
To order the components using the PPO service first go to your Shopping basket and check the box at the left-hand side of the appropriate row.
Next click on the orange Proceed to checkout button.
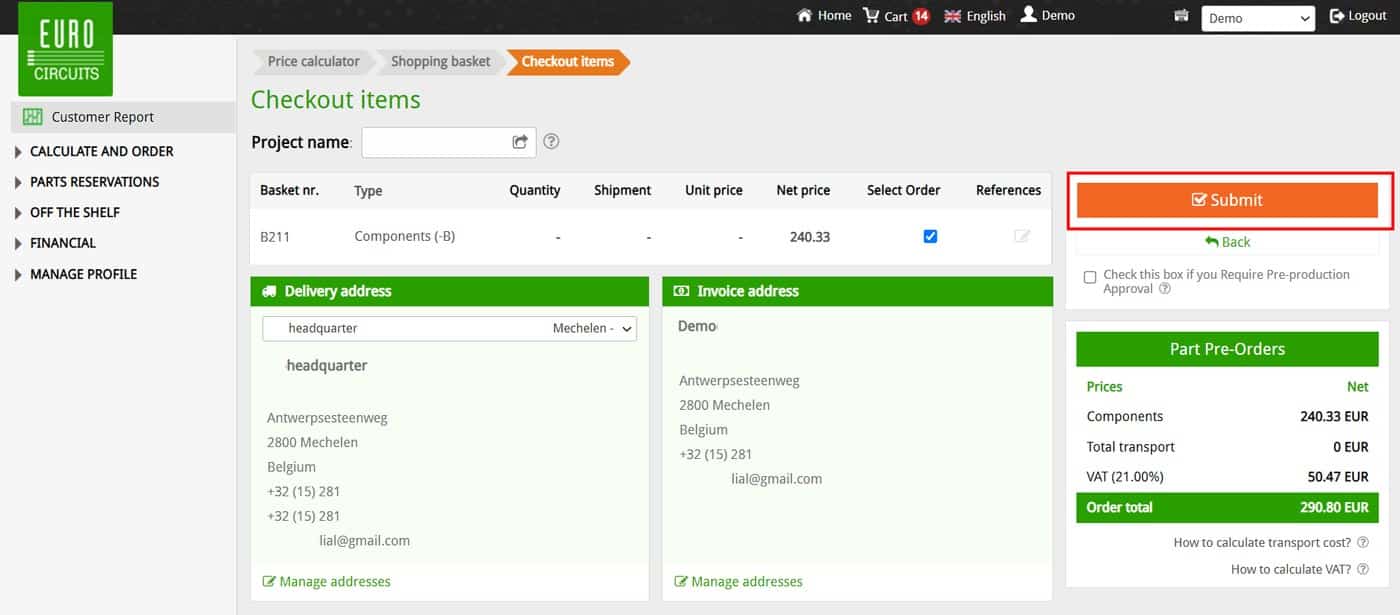
The Checkout items window will open.
Please check the details and if they are correct click on the orange Submit button (top right).
NOTE
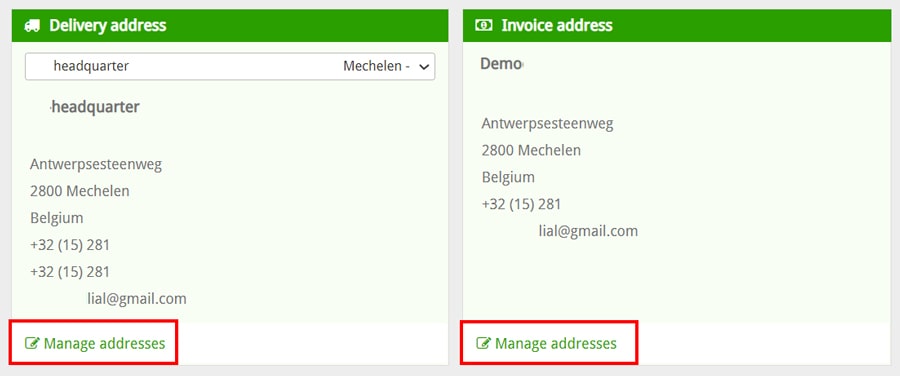
- If you need to change the delivery or invoice details (and have the account privileges to do so) this can be done by clicking on the Manage addresses link at the bottom of the Delivery address and Invoice address sections.
Once you have clicked the Submit button then the Order receipt window will open.
The order will appear in View running orders under the CALCULATE AND ORDER menu of your customer account with the status either BOM analysis or On Hold.
Our engineers will now process the order and if they have any questions or require further information, they will contact you via the Data feedback process.
Once the PPO is processed the View running orders will be updated and will now contain 2 separate rows with the same order number.
- Exxxxxxx-PP1 – This is the PPO order, subsequent PPO orders for the same basket item will have the suffix -PP2, -PP3 etc.
- Exxxxxxx – This is the order for the PCBs and Assembly and can be modified.
IMPORTANT
- Once a PPO order is processed it can no longer be modified. Only the order without the -PP1 suffix can be modified.
- If you need to increase the number of PCBs to be assembled and need to order additional critical parts you can either:
- Create a new PPO in advance of placing the final PCB and Assembly order.
or - We will source all additional parts that have not been pre-ordered when you place the final PCBs and Assembly order – This may lead to a delay in delivery depending upon the availability of certain parts.
- Create a new PPO in advance of placing the final PCB and Assembly order.
Modifying Your PCB and Assembly Order
As your design evolves you can edit the order by uploading or adding extra data or changing the order details.
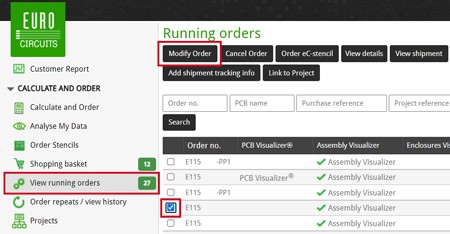
To edit your order, check the check box at the start of the row that contains the appropriate order number (the one without the suffix -PP).
Next click the Modify Order button above.
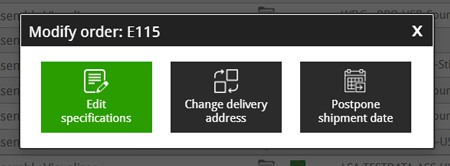
A pop will open asking what you would like to modify.
Select one of the options.
Edit Specifications
If you click on this option, the Visualizer tools will open and you able to:
- Upload PCB data
- Modify PCB order details
- Upload new BOM data
- Edit the BOM data
- Upload CPL data
- Check the CPL data
- All other Visualizer tools
- Order Additional PPO
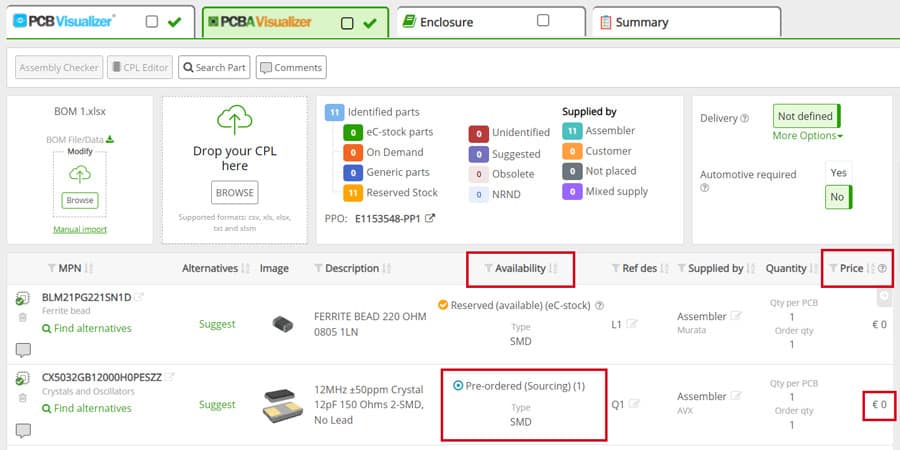
In the PCBA Visualizer any parts ordered using the PPO service will be identified in the Availability column as Pre-ordered.
These will be shown as zero price and will not be taken into account when calculating the price for any additional parts added to the BOM.
IMPORTANT
- Remember to save any changes you make by clicking on the Summary tab and clicking on the orange Save changes button (top right).
Creating Additional PPO
If you have modified your BOM data and you want to pre-order extra components which were not part of the original PPO order.
Firstly, upload the new BOM data for these components and check if the component details and quantity are correct.
Next click on the Summary tab and ensure that only the check box for the row Components is checked in the Add to cart column.
Then click on the orange Save and create extra Part Pre-Order button and follow the instructions.
This will create an extra Part Pre-Order which is processed in the same way as the original one.
In the View running orders this will be identified with the same order number but with the suffix -PP2 and for any additional PPO’s the number of the suffix will increment.
Change Delivery Address
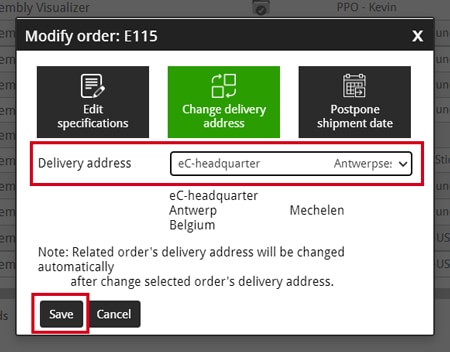
If you select this option, you will be able to select an alternative delivery address from the dropdown Delivery address menu.
The current address is displayed below the Delivery address dropdown menu.
Once you have selected the new delivery address click on the Save button to save the new address to the order.
NOTE
- You are only able to select an address that is already registered in your customer account.
Postpone Shipment Date
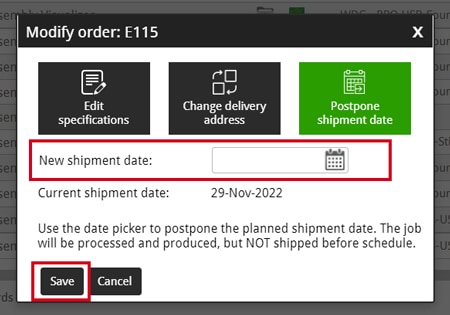
If you select this option, you will be able to select an alternative future shipment date, click on the calendar symbol to open the calendar from which you can select a new shipment date.
The Current shipment date is displayed below the New shipment date selection field.
Once you have selected the new shipment date click on the Save button to save the new shipment date to the order.
IMPORTANT
- The price may change if you change the shipment date.
Checkout your PCB and Assembly Order
If you have uploaded the PCB, CPL and any additional BOM data and are ready to place the order follow the procedure above for Modify Order and select Edit specifications.
Next click on the Summary tab and ensure that the check box for the row PCB, Assembly and Components are checked in the Add to cart column.
Now click on the orange Save and release order button (top right).
This will release the order for production. The already sourced components from the PPO(s) will be used and if necessary, extra components will be sourced.
Excess Components
It is possible that the Part Pre-Order contains parts that your design no longer requires. It is also possible that the PPO contains a higher quantity of parts than are needed in the final design.
In such cases we will still invoice you for these parts and will ship them together with your assembled PCB(s).
Ageing of Part Pre-Orders
When a PPO is launched, we source the components and allocate them to you awaiting the final PCB and Assembly order.
If the final order is not placed within 45 days from the launch of the PPO we will contact you to ask whether we need to wait longer or whether the components in the PPO can be fulfilled, invoiced (if not already done) and shipped to you.

